

How to... Build a Model Castle
- Phil
- Apr 11, 2021
- 4 min read
Updated: Apr 17, 2021
This 'How To' provides step by step instructions to build a model castle out of balsa wood. A craft knife is required and therefore these instructions are only suitable for over 18's. Balsa wood is very fragile and as such the castle made is a model not a toy. This castle design is aimed to be eco friendly and as such uses no glue. You will need 8 sheets of balsa wood each 200mm x 100mm (thickness is recommended to be 1.5mm), a craft mat, a craft knife and a metal ruler. All tools and materials required to follow this guide are available in the Crafty You Crafty Me Model Castle Craft Kit. Enjoy.

Step 1.
Mark out one of your pieces of balsa wood as shown.

Step 2. Cut along the line you have marked out. Take care to not damage the wood, you will need both pieces to create your castle. Cutting in from the edges avoids the wood splitting and cutting away from corners prevents accidentally cutting too far and damaging the wood. Using a metal ruler as an edge will help keep your cut straight.

Step 3. You will have created two pieces (Parts A and B). You will need both pieces to create your castle. Repeat steps 1 and 2 six times so that you have six Part A's and six Part B's.

Step 4. Put your Part B's to one side. The next step is to create six identical sides for your castle, including the castle walls and tower crenellations, using the Part A's. The approach is detailed in Steps 4a thru 4d.

Step 4a. To create the castle tower crenellations mark up and cut out to the dimensions shown. Each Merlon being 10mm high and 12mm wide, with the Crenels being 7mm wide. Each tower should have 3 Merlons and 2 Crenels. Remember to cut in from the edges to avoid the wood splitting and cut away from corners to prevent accidentally cutting too far.

Step 4b. To create the castle wall crenellations mark up and cut out to the dimensions shown. Each Merlon being 10mm high and 14mm wide, with the Crenels being 5mm wide. The wall should have 5 Merlons and 6 Crenels.

Step 4c. As this eco design uses no glue, assembly slots are required to hold the internal and external castle walls together. Cut these slots in each castle tower. 12 in total.

Step 4d. Add arrow-slits to your walls in positions of your liking. We suggest two per tower. Remember that balsa wood is a fragile material so don't cut too many arrow-slits or make them too large.

Step 5. You will now have six castle pieces, three of these will form external castle walls and are complete the other three will form internal walls and require one more step. Take two pieces and follow Step 5a, take one piece and follow Step 5b.

Step 5a. Cut assembly slots as shown in two internal wall pieces.

Step 5b. Cut assembly slots as shown in one internal wall piece.

Step 6. You can now assemble the three internal walls. Probably time for a cup of tea as well. #teabreak

Step 7. You will now create the front internal and external castle walls. Take two new pieces of 200mm x 100mm balsa wood for this.

Step 7a. Mark and cut the crenellations for both the front internal and external walls. Each Merlon being 10mm high and 10mm wide, with the crenels being 9mm wide. The wall should have 11 Merlons and 10 Crenels.

Step 7b. As per Step 4c, assembly slots are required to hold the internal and external castle walls together. Creates these slots in each end of the front internal and external walls.

Step 7c. Mark and cut the castle gate in both the internal and external walls. Take care not to damage the cut out pieces as you will use one of these in the final assembly. Add arrow-slits to your walls in positions of your liking. We suggest the lay out shown, each slit being ~7mm long. Remember that balsa wood is a fragile material so don't cut too many arrow-slits or make them too large.

Step 7d. You will now have two identical front walls. Place one to the side, this will be the external front wall. Cut assembly slots in the second as shown, this will be the internal front wall.

Step 8. Assemble the front internal wall to complete the internal building. Place the construction aside.

Step 9.
This step creates the tower floors, which also pin the internals and external walls together.
Take four of the 'Part B's' created in Step 3.
Mark and cut as shown to produce four 50mm x 50mm squares with centred 20mm x 2.5mm tabs on each side.

Step 10. Slot the four tower floors into the four corners of your internal wall structure. The fit should be snug, be careful not to break or damage the structure, remembering that balsa wood is very fragile. If needed deconstruct the internal walls and fettle the tower assembly slots to allow the floor tabs to fit snuggly.
Step 11. Attach the external walls using the floor tabs and external wall assembly slots, again be careful not to bend and damage the structure whilst constructing. Take time to fettle the external wall assembly slots with the craft knife if needed to ensure a snug fit to the floor tabs.

Step 12. Take the castle gate cut out in Step 7c and place as desired to form the drawbridge.
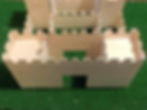
Step 13. Enjoy your model castle creation.
